Wednesday, April 1, 2015

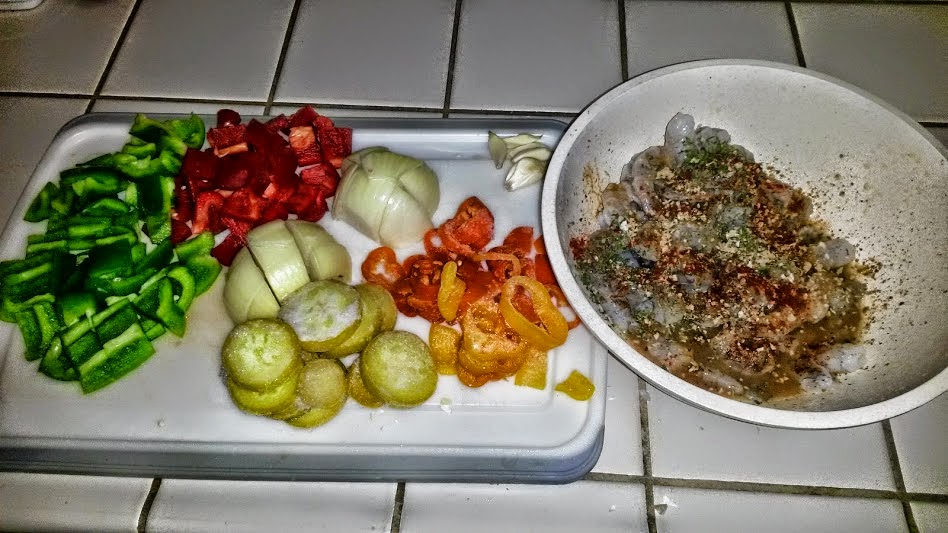
Really Simple Shrimp


REALLY SIMPLE SHRIMP

Shrimp is as common in my freezer as tri tip and chicken! Peeled, cleaned and de-veined shrimp are available in almost every grocery freezer section and are equally as affordable as other meats. My favorite shopping spots for quality and cost savings are the big bag of medium raw, peeled, and de-veined at Costco (they are in a blue bag) and also the brand that is carried at WalMart.
Fresh is always better, but you'll find that at most grocery seafood counters in Bakersfield and in other non coastal cities that the price point will indicate "previously frozen". Once seafood or meat has been thawed it from frozen it is not advisable to re-freeze it so just stick with the frozen in the bag- it is convenient and you won't have to worry about it.
With that said, when you're ready to use it, the best way to thaw is with water. I put a large bowl in my sink and then set a large colander inside it and fill with WARM not hot water. Dump in the shrimp and just move it around with your hand and let it sit a bit. Even a large  bag will thaw within 5-10 minutes. 
To get the tails off, is easy, before pulling on them, give a bit of a squeeze at the tail portion closest to the meat and pull at the same time. You will feel the tail almost release on its own. Or if you are going to bread or grill its okay to leave the tails on while cooking. Also, give them a rinse to remove any additional sediment or scales.


Ingredients:

Raw, de-veined, cleaned shrimp 
2-4 tablespoons Olive Oil
Seasonings of your choice (change up the flavor from Asian, to Mexican, to Caribbean or BBQ!)
1 whole green bell pepper cut into medium chunks
1 whole red bell pepper cut into medium chunks
1 whole yellow bell pepper cut into medium chunks
1 c. yellow squash or other squash
1 medium onion cut into medium chunks
3-4 cloves of garlic

Getting started:

The first thing I do is prepare my shrimp. Rinse and remove tails and strain excess water. I prefer to do a short marinate on my shrimp which includes the seasonings I've chosen, 1/2 the olive oil and the juice from 1 small lime or lemon. Let that set in a bowl while you prepare your vegetables. Shrimp cooks quickly so we will start cooking the veggies first.

Cut your veggies in the same size chunks, this allows them to cook at the same pace. Add garlic at the end to retain some of its flavor. You can dice or press your garlic. Dicing will lend a sweeter more roasted garlic flavor, pressing makes the oils come out and produces a more pungent garlic taste. 


Add veggies and remaining olive oil along with any seasoning to your pan. I like a wok style pan, but any non stick pan will do. Make sure that your pan is large enough to accommodate all your ingredients. I would recommend a 12" skillet. Heat pan on high heat before adding veggies. They should sizzle when entering the pan.


Cook veggies to tender and then add shrimp. Drain shrimp marinade before adding them to the pan. Cook shrimp until they are just pink. Serve and enjoy!

Blessings,

3.1runmom

Saturday, March 28, 2015

The Dreaded Plateau


THE DREADED PLATEAU


Unfortunately, a plateau is a part of any weight loss attempt. Sometimes plateaus are good, sometimes they are bad, but they are always frustrating.
It is really difficult to change your mindset about a plateau, I know this because I have had them and I've been on one for several weeks now.
Usually a plateau means that your body has adapted to your current eating and exercising programs and you need to make some changes to reset it.

A Few Things to Remember About A Weight Loss Plateau:

It has a beginning and and end (study the picture above)
There is a reason for it (good or bad)
You need to study your plateau
Do not quit while you are on a plateau
Everyone has them
The only way off one is to work through it
Plateaus happen even when you are doing everything "right"


The Beginning......

Plateaus can start for many reasons: you are "off" plan with either diet or exercise eating things you shouldn't be or not exercising; your body has adapted to your current diet and exercise patterns and is no longer burning calories but storing them in anticipation, women may have hormonal imbalances each month that may carry over; not drinking enough water so the body starts storing.....and on and on and on.

Walking the Plateau.....

I am always frustrated by a plateau, even though I know it will end it feels defeating....especially your first one because usually it comes after many weeks of great losses. The more weight that needs to be lost, the more plateaus seem to occur.
We talk about this all the time in Weight Watcher meetings and last year I decided that I needed to look at a picture of a plateau and I even did a word study on it! That's the OCD in me needing to know everything about everything! Ha!
So as I started looking at pictures of geographical plateaus I had some interesting observations.......
Let's look at that picture again.....

 Notice that it begins on the left with a very gradual slope upwards and then it flattens off. This is the plateau. Notice how it is flat and even and seems to go on that way for a very long time? THEN WHAT HAPPENS?? It gradually slopes down.

I also noticed that many pictures of plateaus are taken from many miles away so the photographer can capture the ENTIRE structure. This is true of our weight loss plateaus......take a look back at 3 weeks before you hit the plateau, what was happening then and what changed?

Sometimes it is all about perspective. Imagine standing on the middle of that! What would you see differently? Would your perspective change? When we are on a plateau it is hard to see things around us, all we see is the never ending flatness!

The End...

You can't get to the end of your plateau if you don't walk across it to the other side. Notice that there are no detours, no secret passages down, nothing......YOU HAVE TO CONQUER IT.
If you quit you will stay there, there is no other way off it. You can either go back or go forward.

Your Plateau....

Your plateau is all your own. It probably won't look, last or change like anyone elses. Heed there suggestions, though, on how to get off of it. Look at what you have been doing. What are you eating? What are you not eating? What does your body need? Are you exercising? How much and how often? Do you need to increase or decrease or change it up? Are you doing all cardio with no strength training or the reverse?
EXPLORE your plateau!!!


BLESSINGS ON YOUR JOURNEY!!!

3.1RUNMOM


Tuesday, March 24, 2015

Different Cycles on the Carb Cycle

(information taken from www.chrispowell.com)


DIFFERENT CARB CYCLES

I wanted to give some more information on Carb Cycling and why its good for your body. My belief, is that as Americans we definitely take in TOO MANY CARBS! Mainly because we don't know what carbs are and what are bodies do with them. We need carbs, but why we need them is important. There are many trainers, dietitians, nutritionists and fitness experts that recommend carb cycling, they may call it something different but the "jest" of the idea is the same.
The way you cycle should fit what your goals are.
Don't start until you have identified what your goals are and been ok'd by your doctor to change your exercise and eating habits!


Why Cycle Your Food?


How does it work?
In order to lose weight, our bodies need the right combination of proteins, carbs, and healthy fats. Here’s why:
  • Protein builds and maintains muscles and these muscles burn calories like an inferno. Protein also breaks down more slowly than carbs and fat, which burns even more calories and helps you feel fuller longer.
  • Carbs are the preferred fuel source for your muscles and organs, and they come in healthy versions (vegetables, fruits, grains, and legumes), and not-so-healthy versions (cakes, cookies, soda, doughnuts, candy, and many processed foods).  Healthy carbs are also crucial for burning calories, and since they break down more slowly than those not-so-healthy carbs, they keep your blood sugar and energy levels steady, and they also keep your calorie-burning furnace hot so it burns more calories!
  • Healthy fats (unsaturated fats) eaten in moderation help the development and function of your eyes and brain and help prevent heart disease, stroke, depression, and arthritis. Healthy fats also help keep your energy levels steady and keep you from feeling hungry.
So why do we alternate high-carb and low-carb days in carb cycling? On high-carb days you’re stocking your calorie-burning furnace so that on low-carb days your furnace burns fat, and lots of it! This pattern tricks your metabolism into burning a lot of calories, even on those low-carb days. It’s an amazing and well-proven process.


Carb Cycling: The Easy Cycle

Do you have a hard time going without your favorite foods, but you still want to lose weight? Then the Easy Cycle is for you. In this cycle you alternate low-carb and high-carb days, and on every single high-carb day you can have a reward meal, as long as that meal isn’t your dinner meal. That’s right, you can eat the foods you love—four days a week— and still reach your weight loss goals. And by favorite foods I mean pizza, ice cream, bacon, chocolate cake, cheesecake—they’re all okay. The power of this cycle is that if you get those favorite food cravings on low-carb days, you only have to wait until the next day to satisfy them. Anyone can do that! Success can be yours with this cycle.
How is this possible? First of all, you’ll be following my low-carb/high-carb eating plan for your non-reward meals, and the success of this pattern has been proven many times over. And even though you’ll be rewarding yourself, you’ll be rewarding yourself less often. Let’s say you usually eat seven servings of ice cream a week. With the Easy Cycle you’re already eliminating three bowls of ice cream a week, and that’s a lot of calories! You’re satisfying your cravings without depriving yourself, and losing weight.
Here’s what an Easy Cycle week looks like:
carb_cycling_easycycle
For all your meals, on both low and high-carb days, try and eat smaller portions than you would pre-carb cycle. The more calories you can cut, the faster you’ll lose that extra weight!
And yes, you won’t lose weight as quickly as you would in other cycles, but the important thing is that you will lose weight, and you’ll also be forming healthy habits that will last a lifetime. And when you’re ready, you can move onto another cycle if you want to. Or you can stay with the Easy Cycle throughout your weight loss journey. It’s totally up to you!
For more information on the Easy Cycle or any other cycle, check out my book, Choose More, Lose More for Life.


Carb Cycling: The Fit Cycle

Do you want to “lean up” without compromising your athletic performance? Do you want to train for long periods of time? Then the Fit Cycle is the cycle for you. The Fit Cycle not only eliminates fat, but it also supplies your body with the fuel it needs to perform successfully, no matter what sport you choose to excel in.
Unlike the other three carb cycles, the Fit Cycle only has two low-carb days per week, and there’s a very important reason for this: The extra high-carb day allows your muscles to absorb more fuel (glycogen), which you’ll need for maximum athletic performance. During your low-carb days, when this supply of glycogen gets depleted, your muscles will develop insulin sensitivity. When you then have a high-carb day or your reward day, these insulin-sensitive muscles will actually soak up more carbs, your body will burn this extra fuel instead of storing it as fat, and you’ll still lose weight. It’s an amazing process!
Here’s what a Fit Cycle week looks like:
carb_cycling_fitcycle
With the Fit Cycle you won’t lose weight as fast as with the Turbo Cycle, but you will be able to maintain your athletic performance. However, if you do experience a slight decrease in your athletic performance with this cycle, and you’re not as concerned about losing weight, try combining the Fit Cycle with pre- and post-workout supplements or meal replacement shakes with some extra macronutrients.
And as with the other cycles, you can stay on the Fit Cycle or change cycles at any time. It all depends on your weight loss and athletic goals.
For more information on the Fit Cycle or any other cycle, check out my book, Choose More, Lose More for Lif


Carb Cycling: The Classic Cycle

I first introduced the Classic Cycle in my first book, Choose to Lose: The 7-Day Carb Cycle Solution. While the Easy Cycle is the easiest cycle, the Classic Cycle is the simplest carb cycle. It offers a quick and easy introduction to carb cycling and results in fast and steady weight loss.
Unlike the Easy Cycle, which has a reward meal incorporated into every high-carb day, the Classic Cycle has an entire reward day every week. Imagine that—a whole day to satisfy those cravings for your favorite foods! And you’ll still lose weight.
Here’s what a Classic Cycle week looks like:
carb_cycling_classiccycle
With the Classic Cycle, besides losing weight at a quick and constant pace, you’ll also be able to tune into what is happening in your body during this carb cycle process. You’ll learn and actually feel how food affects your body, and while you may experience some brief periods of nausea, headaches, low energy and other symptoms as you change the way you fuel your body, these will be temporary. In the end, you’ll have a whole new appreciation for this marvelous body you have! And as with the Easy Cycle, you can stick with the Classic Cycle throughout your weight loss journey or move onto another cycle. You are in control!
Find more information on the Classic Cycle in both my books—Choose to Lose: The 7-Day Carb Cycle Solution and Choose More, Lose More for Life.


Carb Cycling: The Turbo Cycle

If you want to shed those extra pounds extra fast, the Turbo Cycle is for you. Of the four carb cycles, this cycle takes off weight the fastest. Unlike the Easy and Classic cycles, which alternate low and high-carb days, the Turbo Cycle pits two low-carb days against every high-carb day. That means you’ll burn fat two days in a row before your body’s furnace (metabolism) is re-stoked on your high-carb day, and you’ll lose weight really, really fast!
Even though the Turbo Cycle has an extra low-carb day as compared to the Easy and Classic cycles, it is not a calorie-restricted cycle. Women should not consume fewer than 1,200 calories a day, and men should not consume fewer than 1,500 calories a day. And since you’ll have two low-carb days in a row, you may feel less energetic on the second low-carb day. But this is okay. These low-carb days are powerful weight-loss accelerators!
Here’s what a Turbo Cycle week looks like:
carb_cycling_turbocycle
As with the other cycles, you can stay with the Turbo Cycle as long as you want, or you can change cycles. This program is tailor-made to you and you alone!

Blessings,

3.1runmom


Monday, March 23, 2015

Recipe - Breakfast - Oatmeal


OATMEAL!

I will start by confessing that the texture of this oatmeal is NOT my favorite. But I eat it because it is good for me and it is what my body needs.
I really try to add flavors that are low in calories and low in sugar. You may have to experiment as I did to find something you can live with.
There are plenty of 100 calorie oatmeal options at your grocery; however, what I've found by reading labels is that if it tastes great it is probably high in salt and sugar. Some I looked at were even beyond my daily allowance for just one cup! Eek!
I certainly don't want to get that from my oatmeal and it was pointed out to me that loading up on sugar during the breakfast meal is not good fuel for your body and will almost counteract what you're trying to accomplish with the oatmeal to begin with.

This was my recipe today:
(I added a bit of my protein shake to help with creaminess)


Ingredients:

1/3 c. Coach's Oats (dry)
1 med Granny Smith Apple peeled and diced
2 tsp cinnamon
2 tsp sugar
1 tsp vanilla extract
1/4 c. milk or protein shake (optional)

Putting it together:

Place all ingredients EXCEPT vanilla into microwave safe bowl, stir just a bit. Microwave on high for 4 minutes. Let it set for 1-2 minutes, add vanilla and milk or protein shake and stir.

**These oats can be purchased in a bulk bag as pictured at Costco. I think they also make a single serving packet because I received one in a racer's goodie bag recently but I haven't investigated on where to buy them.

**If you prefer Maple & Brown Sugar flavor it is easy enough to change this up: instead of apple, sugar and vanilla add 3 tsp brown sugar and 1/4 c sugar free maple syrup.

**I have also tried adding these oats dry to my protein shakes and blending them with banana, its pretty decent, you definitely can crunch on the oats while drinking so be careful, but the point is to get the oats in you!


Eat it for your health!

3.1runmom

Tuesday, March 17, 2015

Recipe - Meatloaf: Simple & Versatile


MEATLOAF - SIMPLE & VERSATILE

Meatloaf was a staple in my home growing up and I love to make it now for my family. It is a versatile dish that can be made with ANY meat. This recipe will just use ground beef; however, you can combine ground meats in any combination. Sometimes I do chicken and pork, beef and chicken, turkey and pork or whatever I have on hand. 
The other nice thing about meatloaf is that you can season it differently each time to switch up the flavor. This recipe will use ketchup but you could easily substitute bbq sauce or leave the sauce out entirely and just use tomato sauce.
To switch it up for a low carb day, instead of the breadcrumbs substitute mozzarella cheese as the binder!
It's your loaf - make it your way!
The other items I added are just some leftover vegetables and they roast beautifully right alongside at the same temperature!
Mini meat loaves or single serving sizes can also be made the same way!


Ingredients:

1 lb ground beef or meat of your choice 
1/4 c. diced red onion 
2 cloves garlic, diced
1 egg or equivalent egg beaters
1 c. Panko bread crumbs
1/4 c. ketchup and 1/4 c. for topping
1/4 c. red wine or red cooking wine
1 c. diced mushrooms
1/4 c. Worcestershire sauce
Salt, pepper and other seasoning of your choice


Putting it together:

Preheat oven to 450 degrees.

Add all ingredients to large mixing bowl, then.......mix it together USING YOUR HANDS! Yup it gets messy but the ingredients get a better mix this way! Then transfer to a baking sheet and form loaf. You can use a loaf pan however I find that it takes longer to cook, is messy to get out of the pan and clean up is icky. If a baking sheet is used you can also roast some vegetables at the same time and also cut and serve from the pan!

Once loaf is formed I top mine with a bit more ketchup. The sugar and tomato create a sweet type of glaze. If you use bbq sauce or tomato sauce do the same.

** Other things I sometimes add: green bell pepper, cheese instead of breadcrumbs, hot sauce, or whatever I have that sounds good!

Place on middle to lower oven rack and cook for about 30-35 minutes. Use your meat thermometer to get temp up to 155-160 degrees. Let set for about 5-10 minutes before slicing.

**Meatloaf freezes and stores well in the refrigerator so it would be something for a change up in your prep day.

**Meatloaf is also great for breakfast sliced with a fried egg on top!

Enjoy!

3.1runmom


Monday, March 16, 2015

My Garden


MY GARDEN- Feeding my body & soul

I've always enjoyed growing things. Whether its flowers, plants or vegetables. My grandpa always had a garden. It was filled with sweet peas, carnations, a huge lemon tree, asparagus and lots of other things.
I love digging in the dirt!

My favorite type of gardening is container gardening. I have tomatoes, artichokes, a small citrus tree, and egg plant going right now.

In my yard I also have a few pomegranate bushes, a dwarf granny smith apple tree, a pear tree, cherry tree and peach tree. I like the dwarf variety because they are shorter and easier to care for. Ummm....... they aren't pictured in this posting because I haven't weeded or pruned them yet! Ha! So stay tuned for after they have had their makeover!!!

As Spring gets more underway, I'm also looking forward to planting a large basil crop as well as attempting to "regrow" some root vegetables like celery and asparagus from leftover stalks so you'll have to stay tuned for that!

My backyard/garden is my time for reflection and meditation. God speaks to me here while I'm watering, weeding and tending. There is something soothing about tending a garden, something that connects your soul to what is real and beyond this world. Something that tunes you in to our Creator and his work.

God placed his first creations on earth in a garden.... Genesis 2: 8 "Now the Lord God had planted a garden in the east, in Eden; and there he put the man he had formed".

Here are a few early pics from this year's starters and a few tips to help you grow your own!

 Just one of my artichokes.....the bigger one needs some attention but they love the heat and cold in Bakersfield! They do go dormant in the winter but pop right back up in February!

This is one of my tomato plants surrounded by marigolds. I love these cages. I bought them at OSH several years ago. The key to planting a strong tomato is burying the stalks. When you buy one already started bury it in your soil leave and all up to the very top leaves. This will give you stronger roots and a sturdy plant. Also, if you buy a pre started plant it will want to flower early. Pick off the flowers and any suckers until you have some substantial growth.

 These are two Japanese eggplants, just getting started. Looks like someone has been nibbling on them! Also used marigolds here to help with snails and slugs. They will grow as tall as the tomatoes and I will need a cage for them. Japanese eggplant is nice because they grow long and thin like a squash.

 This is my poor little orphan citrus! There is a really funny story behind this little tree. It has been in several different places in my yard, dug up by the dogs, chewed on by the dogs. I wasn't even sure what kind it was because it never bears any fruit! Until this winter! It is apparently an orange tree! It loves this old washer tub planter that a friend gave me years ago. Usually I have flowers planted around it. Need to get to work on that!!!


Don't be afraid to start a small garden of your own! Stay tuned for more gardening info and foods you can easily grow yourself!!!

Blessings,

3.1runmom


Sunday, March 15, 2015

What weight loss really looks like!


WHAT WEIGHT LOSS REALLY LOOKS LIKE!

Weight and loss will look different for each individual!
Everyone carries the bulk of their excess weight in a different way!
Each person loses weight differently and at different rates!


In this picture, to the left I am at my heaviest ever - 280 lbs. I weighed that much for several reasons: depression, over eating, over eating carbs, and no exercise. I wasn't watching, tracking or being mindful of what I was consuming. If it tasted good, looked good, I indulged.

At the point I was ready to get back to a healthy lifestyle, I knew what to do. I knew it would be a very long journey. I knew that taking off 110 lbs was not going to be easy. 

I knew I would have both success and failure.

Weight Watchers had worked before - I'm a 3 time champion so that's where I started. However, with so much to lose, I knew I would need more accountability and did not do just the online program, I now needed the meetings. And I HATE MEETINGS of any kind. I hate to sit, hate to listen, hate to be still. But you can't hear unless you sit and be still - and I needed to listen.

After about 2 months of steady weight loss I new it was time to start exercising.
I started by walking. I started SLOW and SHORT. I'm very blessed to have some great parks and walking routes in my neighborhood so I took advantage. 

I started by walking up to the park and back home - no fast, not racing just walking.
Each time I went out, I went a bit faster and a bit further and sometimes it was only 1 block.
Can you lose weight without exercising- yes- but I don't recommend it- see my blog post on that!


After losing about 60 lbs. a friend who had his own fitness gym was contacting me about trying his boo tcamp workout. Yeah, I said it to - "I can't do that" and each time he would say "yes you can, come try it". It took Chris about 2 months but I gave in. What's the worst that could happen? I go - I hate it- I don't go again- no big deal.

Here's the problem - I went, I COULD DO IT and I LIKED IT!

Yes. ANYONE can do the workouts I do.
I MEAN ANYONE

But you have to want to - you have to be willing to try.


So after a year I had lost the 60 lbs and an incredible 30 INCHES off my body!
And then it happened.......

I stalled and even started gaining!

For about 3 months.

It was agonizing.

I new that I needed to change something, but I didn't know what.

The change:
I started Carb Cycling (see my blog post or go to www.chrispowell.com)
I added more workouts

My body was adapting to my routine - I had to change my routine.

Sure enough after 2 weeks I was back on track and losing steadily again! I still have 60 lbs to go!
Take a closer look at this chart, notice the peaks, notice the valleys, notice the plateaus!
This is my actual Weight Watchers weigh in chart. I weigh in once each week.


THINGS TO REMEMBER:

The scale is pounds
The tape measure is inches

YOU NEED TO DO BOTH
to get and accurate picture of your loss.

Sometimes you will lose inches and gain pounds.
THIS IS NORMAL as fat turns into muscle!

DRINK WATER - DRINK at least 1 gallon each day!

JUST KEEP GOING!

Blessings on your journey!

3.1runmom

Friday, March 13, 2015

Recipe- Chicken Salad


CHICKEN SALAD

This is something that I always overlook! I prep so much chicken on my meal prep day that I forget what yummy things I can make out of it! This recipe is easy and very versatile so dress it up anyway you want! Again, I'm eating it for lunch today as I type- dripping everywhere!
Today is a low/no carb day so I'm eating mine on large romaine lettuce leaves. On a high carb day enjoy it on your favorite whole grain bread or in a tortilla wrap!


Ingredients: (quantities are for this two leaf serving, you can make more and stores well)

3-4 oz cooked chopped chicken breast (I used a rotisserie chicken from prep day)
2 - 3 tablespoons sliced or diced pimento
2-3 finely diced celery stalks
2-3 tablespoons miracle whip or mayo
Salt & pepper to taste


Putting it together:

I prefer my chicken salad finely chopped so everything gets a really good going over with my knife. Add all ingredients to a medium mixing bowl and mix together! Done! How easy was that?

Put on top of 2 large romaine lettuce leaves and enjoy, eat with crackers or toast, put on your favorite whole grain bread, sourdough bread, atop your favorite salad mix or in a tortilla for a wrap!

**Salad can be mixed ahead of time; however, only stays fresh and crisp for about 2 days.Make it easier to put together by keeping chopped chicken and finely chopped celery pre bagged in your fridge or freezer!

Blessings,

3.1runmom


Thursday, March 12, 2015

Breakfast Recipe - Wraps!


BREAKFAST WRAPS
(this is my breakfast this morning, in fact, I'm eating it as I type!)

I really like "burrito style wraps". They are versatile, travel well, freeze well and you can stuff them with just about anything you want! I was dreaming about this particular one this morning during my workout! Ha! And I was telling Chris all the details about what was going into it, the prep, etc! My workout was all about the food this morning!


Ingredients:

1 Tortilla of your choice ( I use Ole brand and I have more about those at the end of this post)
1 egg or 1 cup of egg substitute (I usually use egg beaters single serve cups)
1 cup diced vegetable of your choice (today I used zucchini)
1 cup diced potato (I make 4 baked potatoes on prep day and keep them in my fridge then dice and heat and saute with my veg)
3 - 4 strips of Turkey bacon or meat of your choice (chicken or ground meats work well too)
2 tablespoons olive oil
Salt, pepper and other seasoning to taste
Salsa to taste on the side


Putting it together:

I use only one 10" fry pan for this meal. Start by cooking your turkey bacon. I cut my strips in half before cooking so they are ready to go. Next saute your vegetable and pre cooked potato dices with 1/2 the olive oil and seasoning. Last cook your egg to taste. I usually scramble mine but you could easily to fried or over easy, however you like it.

(I only used about 1/2 of what I made so I'll probably have this for dinner as well!)

Next assemble your wrap. Lay tortilla on plate. Layer ingredients then wrap. Start by folding outside edges in, then fold away from you in a tight wrap. I have cut mine in half for convenience but you can leave whole. Serve with salsa on the side.


It's a wrap! Easy peasy!

** you can fill this wrap with whatever you want, whatever your favorites are.
** you can make more than one and they do freeze well or keep in the fridge for later

MORE ON THE TORTILLAS:

**These tortillas are 1 WW point each! They are FULL SIZE and really delicious! They have the texture of a flour tortilla but are made with whole wheat.

**They come in three flavors: tomato basil (my fav), spinach (my daughter's fav) and whole wheat. I find that all WalMarts carry all three flavors regularly. They are located by the tortillas that are near the hot dog/hamburger buns. DON'T go looking for them by the tortillas in the deli area!

**Nutritional Info: 
90 cals each
0 fat
0 cholesterol
350 mg sodium
14 g carbs
9 g fiber
0 sugar
5 g protein
*They do unfortunately contain wheat gluten

Enjoy!
3.1runmom

Wednesday, March 11, 2015

Shiratake Noodles - Product & Recipes

SHIRATAKE NOODLES


I first discovered these noodles about 2 years ago and they are a staple in my pantry!
Shiratake noodles are made from Konjac which is a Japanese yam. The yam is dried and then ground into flour and then the noodles are made. YUP- NO WHEAT - NO GLUTEN!
They are also ZERO CALORIES, ZERO FAT, ZERO SUGAR, only 4 carbs, 1 g of fiber, 2 g of protein!
Shiratke noodles are a great substitute for ANY PASTA!

Brands: there are several different bands available: NoOodles, Nasoya, Miracle Noodle, etc.
DON'T BUY: don't buy the brands that say "tofu" unless you want some added calories, fat, etc.

While you can get the shiratake noodles at most Asian Markets (they are refrigerated), Vons, Winco and other groceries in Bakersfield by the tofu products/produce, I usually just order mine off amazon.com for convenience.

My Favorites: the NoOodle brand.

Preparation: all shiratake noodles (unless dried) come packed in liquid. This is because they are a vegetable! And like all canned or packaged vegetable products they need liquid; however, they DO NOT need to be refrigerated! Even the one's that are sold in the refrigerated section, do what you're comfortable with.

Preparing them is simple! 


 (be careful- this one has calories because they have added chickpea flour and potato starch, but there is one by this brand that doesn't contain those)

If you get the packaged one's at the market you will have to empty the contents into a strainer and then RINSE them. They will have a fishy smell- don't worry it washes off and is just a byproduct of the yam sitting in the water. This is why I buy the NoOodle brand.


If you buy the NoOodle brand they are packaged in a broth (either chicken or tomato) and do not have to be rinsed. You can choose to use the broth or not. NO fishy smell. They DO NOT have to be refrigerated.

If you are making a ramen type soup then just heat them up in a soup pot, add your veggies or whatever and you're done.

If you are making stir fry you will want to pan fry the noodles first to remove the liquid, this does take sometime depending on how dry you want your noodles. Keep in mind that these noodles DO NOT HAVE STARCH and will not dry out and be the same consistency as traditional pasta, but the texture is pleasing, even for a pastaholic like me!

So....here are a few simple recipes to get you started:

RAMEN

1. Drain and rinse noodles if needed. Pour into soup pot, add pre made broth if not using boxed noodles.
2. Add mushrooms, bok choy, cabbage, carrots or other vegetables to taste.
3. Bring soup to a boil for about 3 minutes.
4. Cool a bit and enjoy!

SPAGHETTI OR LINGUINE

1. Drain and rinse noodles if needed. Box noodles only need to be drained not rinsed.
2. Place noodles in hot frying pan and cook for about 5-8 minutes to removed liquid or until done to taste.
3. Remove noodles from pan and set aside. Saute onion, garlic, mushrooms and bell pepper in pan with a small amount of olive oil.
4. Add noodles back to pan and add marinara or tomato sauce of your choice and heat through.
5. Serve with cheese or not as desired and enjoy!


STIR FRY

1. Drain and rinse noodles if needed. Box noodles only need to be drained not rinsed.
2. Place noodles in hot frying pan and cook for about 5-8 minutes to removed liquid or until done to taste.
3. Remove noodles from pan and set aside. Saute choice of meat (chicken or beef), onion, garlic, mushrooms, mini corn, cabbage or other vegetables of choice in pan with a small amount of sesame oil.
4. Add noodles back to pan and add a small amount of soy sauce or other Asian seasonings if desired.
5. Enjoy!

**The great thing about these noodles is they come in just about every shape and size! I even order one that is shaped like rice and it is really good.

**I personally don't care for the wider noodles. I have found that they tend to be more "rubbery" in texture and not worth the effort. I usually will just hold off until carb day to have the real thing.

**Unlike regular pasta, these noodles soak up every flavor so go easy on onions, garlic and soy sauce but that is also what makes them so amazing!

Blessings,

3.1runmom


Tuesday, March 10, 2015

Recipe - Asparagus Stuffed Flank Steak


ASPARAGUS STUFFED FLANK STEAK

I made this for my family tonight and they really loved it. I had to wait until after working out to try it but it was worth it! The recipe is a bit labor intensive but not too difficult for a week night if you plan ahead! The roasted vegetable recipe is in another post from tonight.


Ingredients:

Flank steak (about 3-5 oz per person- what you see here is about 6 oz because I went to Costco!)
Whole fresh asparagus
Olive oil
Seasonings to taste
Poultry twine or tooth picks


Putting it together:

Prepare asparagus and any other vegetables first. You want to rinse and trim the asparagus so that it barely just peeks out of the rolled meat. My stalks were 3-4 inches long. I also used some yellow squash that I spiraled.


Next prepare your meat. If it isn't already cut into desired size strips, do that now. The pieces I got from Costco, honestly, were hard to work with and I left them larger than I normally would. Ideally, 3-4 oz strips are fine so do the best you can. Once cut you'll want to use a meat tenderizer to pound them out. Hint: the flat part of tenderizer is for chicken, the spiky is for beef. No need to cover the beef just pound away until it is more uniform and flat. 

Next layer on your veggies as in the picture above, and roll. The rolls will need to be secured with either poultry twine or tooth picks. I actually forgot I needed these so I used some bamboo skewers broken in half. Twine works the best.

Before adding your rolls to your pan, make sure that it is already quite hot with olive oil. The goal is to get a good sear on each side and then reduce heat to cook more slowly. Once the sear is complete you can lightly cover with a lid to keep the heat in. Cook time is approximately 20-30 minutes depending on how you like your meat and how large your rolls are. Meat temp should be at least 160 degrees.


I served these whole to my family, but its also easy to cut them into smaller slices and they look like pinwheels and really colorful with the asparagus!

Bon a petite!

3.1runmom


Recipe- Roasted Cabbage & Carrots

This is some really YUMMY stuff, even if you don't like cabbage boiled you will probably love it roasted!
Initially I got this recipe on Pinterest (yay pinterest!) and have tweaked it with my personal favorites of spices and other stuff.
My husband, who loathes all things green, even says "when are you going to make that cabbage again"!

Easy to shop for and easy to prepare!


ROASTED CABBAGE & CARROTS

Ingredients:

1 large head of cabbage
4-5 large whole carrots
Olive oil (total about 1/4 cup)
Salt & pepper to taste
Garlic or other fresh or dried seasonings as desired (I like McCormick Montreal Steak Seasoning)


Putting it together:

Preheat oven to 425 degrees.

Peel carrots, slice the long way then in half the short way. Put carrots in a bowl and toss with about 1/2 the olive oil and seasonings. Let sit while you prepare the cabbage. Remove outer leaves from head of cabbage and rinse. Slice cabbage into 1/2 inch rounds and place on baking sheet. Brush each round with remaining olive oil and sprinkle with seasonings. Add carrots to this sheet or on a baking sheet of their own depending on how much room you have. Place in oven on middle to low rack for about 20-25 minutes. The cooking time will vary depending on your oven and thickness of slices. What you're looking for is the cabbage to be browned and roasted on top. Remove, let cool for about 5 minutes and enjoy!

Other vegetable that roast well: potatoes, zucchini, fennel, celery, artichokes, mushrooms.

Blessings,

3.1runmom